Showing posts with label code. Show all posts
Showing posts with label code. Show all posts
Thursday, February 5, 2015
Sample code from todays class on AS3 Tweens 2011 02 17
I talked about the AS3 Tween class today and how it can be used to create motion tweens using AS3 code. For the example discussed in class, I used a for loop to create multiple sprite instances, and multiple tween objects to animate those sprites. The size, color and movement properties of each moving sprite were randomized as well. I also talked about the MOTION_FINISH event related to the AS3 Tween class, and how it can be used with the yoyo() method to make the tweens loop back and forth. Some of my students asked if I could post the sample code from our session today about the AS3 Tween class, so Im posting it here. I also created another version that has more randomized properties. The AS3 Tween class is great for creating simple motion tween animations using code.
Read more »
import fl.transitions.Tween;
import fl.transitions.easing.*;
import fl.transitions.TweenEvent;
import flash.display.Sprite;

var nSprites:Number = 25;
var aSprites:Array = new Array();
var aTweenX:Array = new Array();
var aTweenY:Array = new Array();

for (var i:Number = 0; i < nSprites; i++)
{
     var nRadius:Number = Math.random() * 25 + 10;
     var nColor:Number = Math.random() * 0xFFFFFF;
     var nStartX:Number = Math.random() * stage.stageWidth;
     var nEndX:Number = Math.random() * stage.stageWidth;
     var nStartY:Number = Math.random() * stage.stageHeight;
     var nEndY:Number = Math.random() * stage.stageHeight;

     aSprites[i] = new Sprite();

     aSprites[i].graphics.beginFill(nColor);
     aSprites[i].graphics.drawCircle(0,0,nRadius);
     aSprites[i].graphics.endFill();

     addChild(aSprites[i]);

     aTweenX[i] = new Tween(aSprites[i], "x", Elastic.easeInOut, nStartX, nEndX, 3, true);
     aTweenY[i] = new Tween(aSprites[i], "y", Elastic.easeInOut, nStartY, nEndY, 7, true);

     aTweenX[i].addEventListener(TweenEvent.MOTION_FINISH, onMotionFinish);
     aTweenY[i].addEventListener(TweenEvent.MOTION_FINISH, onMotionFinish);
}

function onMotionFinish(e:TweenEvent):void
{
 e.target.yoyo();
}import fl.transitions.Tween;
import fl.transitions.easing.*;
import fl.transitions.TweenEvent;
import flash.display.Sprite;
var nSprites:Number = 25;
var aSprites:Array = new Array();
var aTweenX:Array = new Array();
var aTweenY:Array = new Array();
var aEasing:Array = new Array(None.easeNone, Back.easeIn, Back.easeOut, Back.easeInOut, Bounce.easeIn, Bounce.easeOut, Bounce.easeInOut, Elastic.easeIn, Elastic.easeOut, Elastic.easeInOut, Regular.easeIn, Regular.easeOut, Regular.easeInOut, Strong.easeIn, Strong.easeOut, Strong.easeInOut);
for (var i:Number = 0; i < nSprites; i++)
{
var nRadius:Number = Math.random() * 25 + 10;
var nColor:Number = Math.random() * 0xFFFFFF;
var nStartX:Number = Math.random() * stage.stageWidth;
var nEndX:Number = Math.random() * stage.stageWidth;
var nStartY:Number = Math.random() * stage.stageHeight;
var nEndY:Number = Math.random() * stage.stageHeight;
var nDurationX:Number = Math.random() * 5 + 2;
var nDurationY:Number = Math.random() * 5 + 2;
var nEasingX:Number = Math.floor(Math.random() * aEasing.length);
var nEasingY:Number = Math.floor(Math.random() * aEasing.length);
aSprites[i] = new Sprite();
aSprites[i].graphics.beginFill(nColor);
aSprites[i].graphics.drawCircle(0,0,nRadius);
aSprites[i].graphics.endFill();
addChild(aSprites[i]);
aTweenX[i] = new Tween(aSprites[i], "x", aEasing[nEasingX], nStartX, nEndX, nDurationX, true);
aTweenY[i] = new Tween(aSprites[i], "y", aEasing[nEasingY], nStartY, nEndY, nDurationY, true);
aTweenX[i].addEventListener(TweenEvent.MOTION_FINISH, onMotionFinish);
aTweenY[i].addEventListener(TweenEvent.MOTION_FINISH, onMotionFinish);
}
function onMotionFinish(e:TweenEvent):void
{
e.target.yoyo();
}Monday, January 26, 2015
Summernote WYSWIG Editor PHP Tutorial with Full Code
Web applications still use the classical wyswig editors. In this Responsive Web Era, everyone looking for responsive wyswig editor, compatible with mobile devices also.
SummerNote is an Open source free wyswig editor build to support of Bootstrap theme framework.
Following is tested in Chrome, Firefox and IE.
One of the Notable feature of this editor is It supports drag and drop file upload,Image will be instantly converted into base 64. Awesome.
I have tested this in Internet Explorer 7, but style broken. From IE 8 it is working perfectly.
Replace the above script part with the following code. Now you will get the Instant File Upload inside article, instead of base64.
Use php move_auploaded_file() function to save the uploaded data to your server.
SummerNote is an Open source free wyswig editor build to support of Bootstrap theme framework.
Requirements
- JQuery
- Bootstrap
- SummerNote JS & CSS
- Fontawesome (Optional)
Create a plain Html File and Paste the Following code and you will get an Responsive Wyswig Editor with Bootstrap 3 support.
I request you to move summernote files to your server, so that it can load faster than Github.
Following is tested in Chrome, Firefox and IE.
 |
| Full Featured WysWig Editor |
 |
| Responsive View on small screen |
<!DOCTYPE html PUBLIC "-//W3C//DTD XHTML 1.0 Strict//EN"
    "http://www.w3.org/TR/xhtml1/DTD/xhtml1-strict.dtd">
<html xmlns="http://www.w3.org/1999/xhtml" xml:lang="en" lang="en">
<script src="//code.jquery.com/jquery-1.9.1.js"></script>
  <!-- include libraries BS3 -->
<link rel="stylesheet" href="//netdna.bootstrapcdn.com/bootstrap/3.0.3/css/bootstrap.min.css" />
<script type="text/javascript" src="//netdna.bootstrapcdn.com/bootstrap/3.0.3/js/bootstrap.min.js"></script>
<link rel="stylesheet" href="//netdna.bootstrapcdn.com/font-awesome/4.0.3/css/font-awesome.min.css" />

<link rel="stylesheet" type="text/css" href="//cdnjs.cloudflare.com/ajax/libs/codemirror/3.20.0/codemirror.min.css" />
<link rel="stylesheet" href="//cdnjs.cloudflare.com/ajax/libs/codemirror/3.20.0/theme/blackboard.min.css">
<link rel="stylesheet" href="//cdnjs.cloudflare.com/ajax/libs/codemirror/3.20.0/theme/monokai.min.css">
<script type="text/javascript" src="//cdnjs.cloudflare.com/ajax/libs/codemirror/3.20.0/codemirror.js"></script>
<script src="//cdnjs.cloudflare.com/ajax/libs/codemirror/3.20.0/mode/xml/xml.min.js"></script>
<script src="//cdnjs.cloudflare.com/ajax/libs/codemirror/2.36.0/formatting.min.js"></script>

<!-- include summernote css/js-->
<link href="include/summernote.css" / rel="stylesheet">
<script src="include/summernote.min.js"></script>
<script>
    $(document).ready(function() {
        $(#summernote).summernote({
            height: 500
        });
    });
</script>
<head>
    <title>Bootstrap WysWig Editor Summernote</title>
    <meta http-equiv="content-type" content="text/html;charset=utf-8" />
</head>

<body>
    <div class="container">
            <div class="row">
                <form class="span12" id="postForm" action="/whateveryouwant.php" method="POST" enctype="multipart/form-data" >
                    <fieldset>
                        <legend>MyCodde.Blogspot.com Editor</legend>
                        <p class="container">
                            <textarea class="input-block-level" id="summernote" name="content" rows="18">
                            </textarea>
                        </p>
                    </fieldset>
                    <button type="submit" class="btn btn-primary">Save changes</button>
                </form>
            </div>
    </div>
</body>
</html>
I have tested this in Internet Explorer 7, but style broken. From IE 8 it is working perfectly.
How to add Instant Image Upload inside Editor
 |
| Drag and Drop Image Upload Feature in summernote |
Use php move_auploaded_file() function to save the uploaded data to your server.
    $(document).ready(function() {
        $(#summernote).summernote({
            height: 200,
            onImageUpload: function(files, editor, welEditable) {
                sendFile(files[0], editor, welEditable);
            }
        });
        function sendFile(file, editor, welEditable) {
            data = new FormData();
            data.append("file", file);//You can append as many data as you want. Check mozilla docs for this
            $.ajax({
                data: data,
                type: "POST",
                url: savetheuploadedfile.php,
                cache: false,
                contentType: false,
                processData: false,
                success: function(url) {
                    editor.insertImage(welEditable, url);
                }
            });
        }
    });
savetheuploadedfile.php
<?php

//TODO List
// 1) Rename the File
// 2) For Multiple Upload , Loop through $_FILES
$dir_name = "uploads/";
    move_uploaded_file($_FILES[file][tmp_name],$dir_name.$_FILES[file][name]);
    echo $dir_name.$_FILES[file][name];
?>

Thats it.
Friday, January 16, 2015
Login using Google Javascript API Sample Code
Latest Google Javascript API allow users to fetch their google profile information, circle details. Javscript API is not just limited to this, but it allow us to fetch and upload Google Drive file. Read more
In this tutorial we are utilizing Google+ Javascript API to fetch user Google+ Profile Details and Email address. It is purely OAuth2 Compatible login method and its secure.
Before you begin this tutorial, you actually need to setup a Project through Google Developer Console. You can follow google docs here.
Step 1: Create Project


Now Client Key and Secret key successfully created.
Note: For javascript based login, we dont use Secret key, only Client Key is enough.
Javascript Code for the Google+ API and Fetching User Details, Email from Google Profile
If you click on the Google+ Login Button it will show a popup like below. This means your configuration in google developer console is right.
Thats it.
In this tutorial we are utilizing Google+ Javascript API to fetch user Google+ Profile Details and Email address. It is purely OAuth2 Compatible login method and its secure.
Workflow is simple
- User Clicks on Login with Google Button on XYZ Website
- Google OAuth2 Popup opens and ask the user login to google account first.
- If Logged in, it shows the permissions that this website is requesting, then user accept this by pressing button Allow.
- Now the website receives the user information which are requested by the XYZ Website ( Login Scope )
Before you begin this tutorial, you actually need to setup a Project through Google Developer Console. You can follow google docs here.
Step 1: Create Project
Step 2: Set the Consent Screen details
Step 3: Create Web application Client Key and Secret
Now Client Key and Secret key successfully created.
Note: For javascript based login, we dont use Secret key, only Client Key is enough.
How to Google+ Javascript Login
Add Google+ Javascript API Javascript Header
  <script type="text/javascript">
  (function() {
    var po = document.createElement(script);
    po.type = text/javascript; po.async = true;
    po.src = https://plus.google.com/js/client:plusone.js;
    var s = document.getElementsByTagName(script)[0];
    s.parentNode.insertBefore(po, s);
  })();
  </script>
Add JQuery & Bootstrap for styling
    <!-- Bootstrap core CSS -->
  <link href="http://getbootstrap.com/dist/css/bootstrap.min.css" rel="stylesheet">

    <!-- Custom styles for this template -->
  <link href="http://getbootstrap.com/examples/signin/signin.css" rel="stylesheet">

  <script src="https://ajax.googleapis.com/ajax/libs/jquery/1.11.1/jquery.min.js"></script>
  <script src="http://getbootstrap.com/dist/js/bootstrap.min.js"></script>
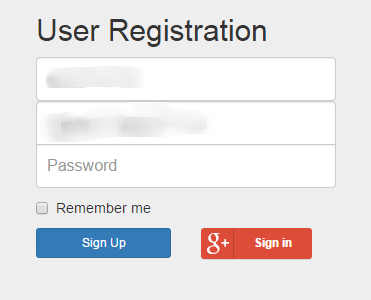
Complete HTML Body code for the Form and Google+ Button
   <div class="container">

      <form class="form-signin" role="form">
            <div id="status"></div>
        <h2 class="form-signin-heading">User Registration</h2>

        <label for="inputFname" class="sr-only">First Name</label>
            <input type="text" id="inputFullname" class="form-control" placeholder="First Name" required autofocus>

        <label for="inputEmail" class="sr-only">Email address</label>
        <input type="email" id="inputEmail" class="form-control" placeholder="Email address" required >

        <label for="inputPassword" class="sr-only">Password</label>
        <input type="password" id="inputPassword" class="form-control" placeholder="Password" required>

        <div class="row">
            <div class="col-md-6">
                <button class="btn btn-sm btn-primary btn-block" type="submit">Sign Up</button>
            </div>
            <div class="col-md-6">
                <button class="g-signin "
                    data-scope="https://www.googleapis.com/auth/plus.login https://www.googleapis.com/auth/userinfo.email"
                    data-requestvisibleactions="http://schemas.google.com/AddActivity"
                    data-clientId="1049178870057-usbfluijl3qtq3nijmucnsksr9gvkag4.apps.googleusercontent.com"
                    data-accesstype="offline"
                    data-callback="mycoddeSignIn"
                    data-theme="dark"
                    data-cookiepolicy="single_host_origin">
                </button>
            </div>
        </div>


      </form>

    </div> <!-- /container -->
Javascript Code for the Google+ API and Fetching User Details, Email from Google Profile
    <script type="text/javascript">
    var gpclass = (function(){

    //Defining Class Variables here
    var response = undefined;
    return {
        //Class functions / Objects

        mycoddeSignIn:function(response){
            // The user is signed in
            if (response[access_token]) {

                //Get User Info from Google Plus API
                gapi.client.load(plus,v1,this.getUserInformation);

            } else if (response[error]) {
                // There was an error, which means the user is not signed in.
                //alert(There was an error:  + authResult[error]);
            }
        },

        getUserInformation: function(){
            var request = gapi.client.plus.people.get( {userId : me} );
            request.execute( function(profile) {
                var email = profile[emails].filter(function(v) {
                    return v.type === account; // Filter out the primary email
                })[0].value;
                var fName = profile.displayName;
                $("#inputFullname").val(fName);
                $("#inputEmail").val(email);
            });
        }

    }; //End of Return
    })();

    function mycoddeSignIn(gpSignInResponse){
        gpclass.mycoddeSignIn(gpSignInResponse);
    }
    </script>
If you click on the Google+ Login Button it will show a popup like below. This means your configuration in google developer console is right.
 |
| Login using Google Popup |
Subscribe to:
Posts (Atom)