Thursday, March 12, 2015
Approval Workflow using Apps Script
Editor’s Note: This blog post is authored by Dito’s Steve Webster who is a Google Apps Script Top Contributor - Saurabh Gupta
Ethics Disclosure Review Workflow
Recently a company who operates retail stores throughout a few states reached out to Dito. When their associates conduct business discussions with vendors or customers where monetary exchanges are involved, their Ethics Disclosure policy requires a log for each event, a supervisor approval, and committee review.
The customer’s existing disclosure review process was cumbersome and time consuming. The employees would add a disclosure review request to a spreadsheet with 29 columns. The new review request would then be reviewed by their supervisor. The supervisor and the employee would go back and forth exchanging emails and making changes to a dense spreadsheet until an approval was granted. It was clear that the customer needed a workflow solution. They decided to hire Dito to build a workflow solution based on Google Apps Script.
Workflow Solution based on Google Apps Script
To make the process more user friendly and productive, Dito decided to build a user interface to collect ethics disclosure events, make updates, and automate the routing of email notifications. Writing a Google Apps Script to create a user interface (UI), enabled associates to interact with their contacts to select their supervisor’s email address and simplify the data collection with list boxes. The script sends approval emails with HTML form radio buttons, text box, approve/decline buttons, and a “Post” command to invoke other workflow scripts. Below are some of the main design points for this Approval Workflow script.
1. Disclosure Review Workflow
The Disclosure Review workflow requires (a) Associates to fill out the Ethics Disclosure form. (b) Supervisor to either approve or decline the submission. (c) If supervisor approves, the Ethics Disclosure Committee is notified. (d) If supervisor declines, the associate is notified to make corrections. (e) After improving the submission, the workflow repeats itself.

2. Disclosure Review Request Form
Dito developed a custom review request form. A form was developed using Google Apps Script’s UI Services. The form provides the ability to look up data to populate such things as a drop-down list box. This form allowed real-time email look-ups by using the Apps Script’s Contacts service. First efforts included per character look-ups in a list box, but since they have over 1,000 users, it was best to enter the first and/or last name of their supervisor before initiating the look-up (see code snippet below).
var byName = ContactsApp.getContactsByName(searchKey);
for (var i in byName) {
  var emailStr  = byName[i].getPrimaryEmail();
  // If there is no primary email, try again for the next email
  if (emailStr == null)
     var emailStr  = byName[i].getEmails()[0].getAddress();
  // If emailStr is still null, try again by getting the next email
  if (emailStr == null)
     var emailStr  = byName[i].getEmails()[1].getAddress();
}
Another dynamic field was the “activity type”. Depending on the selection more form fields are displayed. For example, if the activity type is “Meals”, display a list box to select lunch or dinner.
3. Approve or Reject directly in Gmail
When an associate submits his/her review request by using the custom form within a spreadsheet, their supervisor receives an email with easy-to-read HTML formatted results. The approval decision, as well as a comment field (e.g. decline reason), is made within the email. This is more productive and prevents unnecessary back and forth into the spreadsheet.

If the request is declined by the supervisor, the associate who submitted the review request receives an email and can review the details. The email also contains a “Continue” button which opens the form in a new browser tab. After corrections are submitted, the supervisor receives another email and the workflow repeats itself.

When approved, the Ethics Disclosure Committee is notified by sending a group email within the script.
4. Saving Workflow History
Since history records existed in their original spreadsheet form and they wanted to insert these records into the new work flow spreadsheet as a one-time task, an Apps Script was used to copy the data. Of course their columns did not match the new spreadsheet. By using a mapping approach and a “read once” and “write once” technique, the Apps Script quickly made the changes.
function myFunction() {
  var ss           = SpreadsheetApp.getActiveSpreadsheet();
  var sheet        = ss.getSheetByName(Sheet 1);
  var rowsWithData = sheet.getRange(2, 1, sheet.getLastRow(),
                     sheet.getLastColumn()).getValues()
  var sheet1Data = [];
  var sheet2Data = [];
  for (var i = 0; i < rowsWithData.length; i++) {
    switch (rowsWithData[i][4])   // This is the activity type
    {
      ...
      case "Gift":
            sheet1Data.push([rowsWithData[i][12], rowsWithData[i][13],
                             rowsWithData[i][14]]);
            sheet2Data.push([rowsWithData[i][15]]);
            continue;
      ...
      default:
            continue;
    }
  }
  sheet.getRange(2, 6,  sheet1Data.length, 3).setValues(sheet1Data);
  sheet.getRange(2, 12, sheet2Data.length, 1).setValues(sheet2Data);
}
Google Apps Script is very powerful and Dito uses it to build interesting solution for its customers. If you are using Google Apps then be sure to use Google Apps Script. You’ll be amazed with what you can build with it.
 | Steve Webster profile Google Sites and Scripts expert from Dito specializing in training and application development. When not busy finding solutions to enhance customer capability in Google Apps, Steve shares examples of his work in the Google Apps Developer Blog. |

Wednesday, March 11, 2015
4 ways to do Mail Merge using Google Apps Script
Update (August 2014): Try the Yet Another Mail Merge add-on for Google Sheets.
Editor’s Note: This blog post is co-authored by James, Steve and Romain who are Google Apps Script top contributors. -- Ryan Boyd
The Google Apps Script team is on a roll and has implemented a ton of new features in the last few months. Some of us “Top Contributors” thought it will be a useful exercise to revisit the Mail Merge use case and discuss various ways in which we can do Mail Merge using Apps Script. Below are several techniques that tap into the power of Google Apps Script by utilizing Gmail, Documents and Sites to give your mailings some zing. Mail Merge is easy and here is how it can be done.
1. Simple Mail Merge using a Spreadsheet
The Simple Mail Merge tutorial shows an easy way to collect information from people in a Spreadsheet using Google Forms then generate and distribute personalized emails. In this tutorial we learn about using “keys,” like ${"First Name"}, in a template text document that is replaced by values from the spreadsheet. This Mail Merge uses HTML saved in the “template” cell of the spreadsheet as the content source.
2. Mail Merge using Gmail and Spreadsheet Services
The Gmail Service is now available in Google Apps Script, allowing you to create your template in Gmail where it is saved as a draft. This gives us the advantage of making Mail Merge more friendly to the typical user who may not know or care much about learning to write HTML for their template. The mail merge script will replace the draft and template keys with names and other information from the spreadsheet and automatically send the email.
To use this mail merge, create a new spreadsheet, and click on Tools > Script Gallery. Search for “Yet another Mail Merge” and you will be able to locate the script. Then, click Install. You’ll get two authorization dialogs, click OK through them. Add your contact list to the spreadsheet, with a header for each column. Then compose a new mail in Gmail. Follow this syntax for the “keys” in your template: $%column header% (see above). Click Save now to save your draft. Go back to your spreadsheet and click on the menu Mail Merge. A dialog pops up. Select your draft to start sending your emails.
You can add CCs, include attachments and format your text just as you would any email. People enjoy “Inserting” images in the body of their emails, so we made sure to keep this feature in our updated mail merge. To automate this process we will use a new advanced parameter of the method sendEmail, inlineImages. When the script runs it looks in the email template for images and make sure they appear as inline images and not as attachments. Now your emails will look just as you intended and the whole process of mail merge got a whole lot simpler.
3. Mail Merge using Document Forms
The next Mail Merge will use a template that is written in a Google Document and sent as an attachment. Monthly reports, vacation requests and other business forms can use this technique. Even very complex documents like a newsletter or brochure can utilize the automation of Google Apps Script to add the personal touch of having your patron’s name appear as a salutation.
Like in the Mail Merge for Gmail, the Google Docs template will use “keys” as placeholders for names, addresses or any other information that needs to be merged. Google Apps Script can add dynamic elements as well. For example you may want to include a current stock quote using the Financial Service, a chart from the Charts Service, or a meeting agenda automatically fetched for you by the Calendar Service.
As the code sample below demonstrates, the Google Apps Script gets the document template, copies it in a new temporary document, opens the temp document, replaces the key placeholders with the form values, converts it to PDF format, composes the email, sends the email with the attached PDF and deletes the temp document.
Here is a code snippet example to get you started. To use this mail merge, create a new spreadsheet, and click on Tools > Script Gallery. Search for “Employee of the Week Award” and you will be able to locate the script.
// Global variables
docTemplate = “enter document ID here”;
docName = “enter document name here”;

function sendDocument() {
// Full name and email address values come from the spreadsheet form
   var full_name = from-spreadsheet-form
   var email_address = from-spreadsheet-form
// Get document template, copy it as a new temp doc, and save the Doc’s id
   var copyId   = DocsList.getFileById(docTemplate)
                  .makeCopy(docName+ for +full_name)
                  .getId();
   var copyDoc  = DocumentApp.openById(copyId);
   var copyBody = copyDoc.getActiveSection();
// Replace place holder keys,
   copyBody.replaceText(keyFullName, full_name);
   var todaysDate =  Utilities.formatDate(new Date(), "GMT", "MM/dd/yyyy");
   copyBody.replaceText(keyTodaysDate, todaysDate);
// Save and close the temporary document
   copyDoc.saveAndClose();
// Convert temporary document to PDF by using the getAs blob conversion
   var pdf = DocsList.getFileById(copyId).getAs("application/pdf");
// Attach PDF and send the email
   MailApp.sendEmail(email_address, subject, body, {htmlBody: body, attachments: pdf});
// Delete temp file
   DocsList.getFileById(copyId).setTrashed(true);
}
4. Mail Merge using Sites and Spreadsheet Services
For the last example let’s assume you have a great Google Site where you create new letters for your followers. However, you have had some feedback suggest that while many users don’t mind visiting your site, some would prefer to have the newsletter emailed to them. Normally this would require copying and pasting into an email or doc. Why not simply automate this with Google Apps Script?
The body section of a site, the part you edit, can be captured as HTML by the Sites Service and placed in the body of an email. Because the return value is HTML, the pictures and text formatting come through in the email.
Here is a simple example for you to try out:
function emailSiteBody() {
 var site = SitesApp.getPageByUrl(YourPageURL);
 var body = site.getHtmlContent();

 MailApp.sendEmail(you@example.com, Site Template, no html :( , {htmlBody: body});
}
It really is that simple. Add a for loop with email values from a spreadsheet and this project is done.
Happy merging!
Updated 10/28: fixed instructions for accessing the complete script source for solution 3.
 | James Ferreira profile Author, Scripter, and developer of free apps for non-profits and schools, James has written software to help more than half a million people by extending Google Apps. |
| Steve Webster profile Google Sites and Scripts expert from Dito specializing in training and application development. When not busy finding solutions to enhance customer capability in Google Apps, Steve shares examples of his work in the Google Apps Developer Blog. |
 | Romain Vialard profile | YouTube Google Apps Change Management consultant at Revevol, Romain writes scripts to automate everyday tasks, add functionality and facilitate rapid adoption of cutting edge web infrastructures. |
Tuesday, March 10, 2015
Unshare domain user’s contact information programmatically using the Google Apps Profiles API
Some users want enhanced privacy but unsharing a user’s contact information could only be done using the control panel web UI.

We just introduced a new element in the Google Apps Profiles API that lets domain administrators set this option programmatically. This new field is called
gContact:status and is available under a User Profile entry:<gcontact:status indexed="true"/>Changing the
indexed attribute value to false unshares the user contact’s information when “contact sharing” is enabled on the domain.For more information about the Google Apps Profiles API and code samples for supported languages using our client libraries, please refer to the developer’s guide. To learn how you can use 2-legged OAuth and batch requests to programmatically unshare users contact’s information with our client libraries, please have a look at this article.
 | Alain Vongsouvanh profile | events Alain is a Developer Programs Engineer for Google Apps with a focus on Google Calendar and Google Contacts. Before Google, he graduated with his Masters in Computer Science from EPITA, France. |
Want to weigh in on this topic? Discuss on Buzz
Tuesday, January 27, 2015
Creating a Pentomino game using AS3 Part 2
I plan for my game to have multiple levels (maps), and each map may differ in size and shape. Since some maps can be rather big and take a lot of space, when smaller maps take much less space, there is a problem with positioning the grid properly so that most of the available screen is used.
I am going to reserve some space for a toolbar panel, which will later contain the available shapes and other game info. My game dimensions right now are 720x460. The panel will reserve 200 pixels in width, including the space left to the right screen edge. That means the width of the panel will be 195 pixels, its height - 450 pixels, because Im leaving 5 pixels for the top, left and bottom margins. Keeping that in mind, the X and Y coordinates of the panel would be 520, 5 pixels.
This leaves us 520x460 free space. Inside of this rectangle, well put our grid. However, once again, remember that Im leaving 5 pixel margins for top, bottom, left and right, so the actual rectangle size is 510x450. Thats the size that we want to fit our grid in, making it take up as much space as possible.
Go to constructor of pentomino_game() class and call a calculateGrid() function before adding gridShape to stage:
public function pentomino_game()
{
// default map
mapGrid = [
[1, 1, 1, 1, 1, 1, 1, 1, 1, 1],
[1, 1, 1, 1, 1, 1, 1, 1, 1, 1],
[1, 1, 1, 1, 0, 0, 1, 1, 1, 1],
[1, 1, 1, 1, 0, 0, 1, 1, 1, 1],
[1, 1, 1, 1, 1, 1, 1, 1, 1, 1],
[1, 1, 1, 1, 1, 1, 1, 1, 1, 1]
];

// grid settings
calculateGrid();
addChild(gridShape);
gridShape.x = gridStartX;
gridShape.y = gridStartY;

// draw tiles
drawGrid();
}
First thing we do in the function is calculate how many columns and rows there are:
var columns:int = mapGrid[0].length;
var rows:int = mapGrid.length;
Write down a memo to remember the numbers were working with:
// free size: 520x460
// fit in: 510x450
Now, using the columns value we can calculate how wide a cell should be to be able to fit in the 510 width rectangle.
// calculate width of a cell:
gridCellWidth = Math.round(510 / columns);
Then we calculate the real width and height of the grid in pixels:
var width:int = columns * gridCellWidth;
var height:int = rows * gridCellWidth;
Now we can set gridStartX value, which is the left margin of the grid. Id set it to 5, but its important to remember that gridCellWidth is a rounded value, it might have been a fraction and if we just set gridStartX to 5, the right marin might be bigger or smaller than 5. Thats why we simply substract width from 520 and divide it by 2, to have the same margin from left and right. This might not always be 5 (it will be around 5 pixels then), but it will look nice since the margins are the same.
// calculate side margin
gridStartX = (520 - width) / 2;
Now, we check if height fits in the 450 high rectangle. If so, then we set gridStartY using the same method we set gridStartX:
if (height < 450) {
gridStartY = (450 - height) / 2;
}
If height is greater than or equals 450, we need to recalculate the whole thing, but set the height first instead of the width. Then we calculate height and width values again, and set gridStartX and gridStartY just like before:
if (height >= 450) {
gridCellWidth = Math.round(450 / rows);
height = rows * gridCellWidth;
width = columns * gridCellWidth;
gridStartY = (460 - height) / 2;
gridStartX = (520 - width) / 2;
}
Full function:
private function calculateGrid():void {
var columns:int = mapGrid[0].length;
var rows:int = mapGrid.length;

// free size: 520x460
// fit in: 510x450

// calculate width of a cell:
gridCellWidth = Math.round(510 / columns);

var width:int = columns * gridCellWidth;
var height:int = rows * gridCellWidth;

// calculate side margin
gridStartX = (520 - width) / 2;

if (height < 450) {
gridStartY = (450 - height) / 2;
}
if (height >= 450) {
gridCellWidth = Math.round(450 / rows);
height = rows * gridCellWidth;
width = columns * gridCellWidth;
gridStartY = (460 - height) / 2;
gridStartX = (520 - width) / 2;
}
}
The results can be observed when you use differently sized maps:
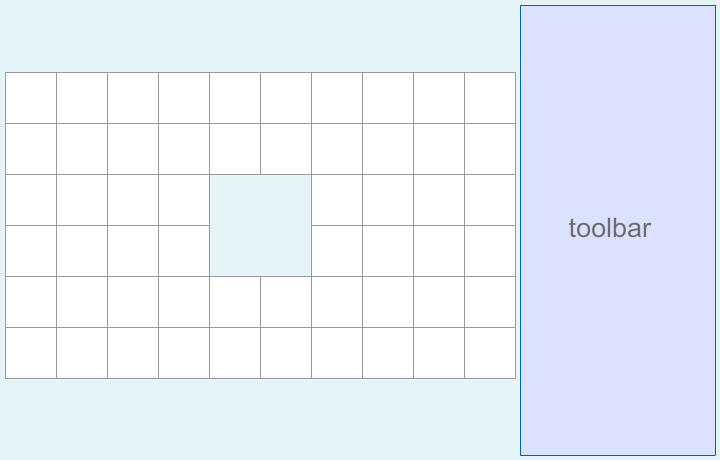
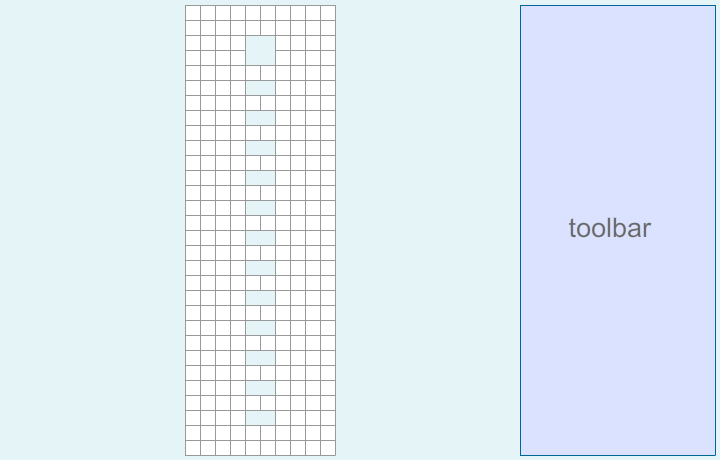
Full code:
package
{
import flash.display.MovieClip;
import flash.display.Sprite;

/**
 * Open-source pentomino game engine
 * @author Kirill Poletaev
 */

public class pentomino_game extends MovieClip
{
private var mapGrid:Array = [];

private var gridShape:Sprite = new Sprite();
private var gridStartX:int;
private var gridStartY:int;
private var gridCellWidth:int;

public function pentomino_game()
{
// default map
mapGrid = [
[1, 1, 1, 1, 1, 1, 1, 1, 1, 1],
[1, 1, 1, 1, 1, 1, 1, 1, 1, 1],
[1, 1, 1, 1, 0, 0, 1, 1, 1, 1],
[1, 1, 1, 1, 0, 0, 1, 1, 1, 1],
[1, 1, 1, 1, 1, 1, 1, 1, 1, 1],
[1, 1, 1, 1, 1, 1, 1, 1, 1, 1]
];

// grid settings
calculateGrid();
addChild(gridShape);
gridShape.x = gridStartX;
gridShape.y = gridStartY;

// draw tiles
drawGrid();
}

private function calculateGrid():void {
var columns:int = mapGrid[0].length;
var rows:int = mapGrid.length;

// free size: 520x460
// fit in: 510x450

// calculate width of a cell:
gridCellWidth = Math.round(510 / columns);

var width:int = columns * gridCellWidth;
var height:int = rows * gridCellWidth;

// calculate side margin
gridStartX = (520 - width) / 2;

if (height < 450) {
gridStartY = (450 - height) / 2;
}
if (height >= 450) {
gridCellWidth = Math.round(450 / rows);
height = rows * gridCellWidth;
width = columns * gridCellWidth;
gridStartY = (460 - height) / 2;
gridStartX = (520 - width) / 2;
}
}

private function drawGrid():void {
gridShape.graphics.clear();
var width:int = mapGrid[0].length;
var height:int = mapGrid.length;

var i:int;
var u:int;

// draw background
for (i = 0; i < height; i++) {
for (u = 0; u < width; u++) {
if (mapGrid[i][u] == 1) drawCell(u, i, 0xffffff, 1, 0x999999);
}
}
}

private function drawCell(width:int, height:int, fill:uint, thick:Number, line:uint):void {
gridShape.graphics.beginFill(fill);
gridShape.graphics.lineStyle(thick, line);
gridShape.graphics.drawRect(width * gridCellWidth, height * gridCellWidth, gridCellWidth, gridCellWidth);
}

}

}
Thanks for reading!
Friday, January 16, 2015
Login using Google Javascript API Sample Code
In this tutorial we are utilizing Google+ Javascript API to fetch user Google+ Profile Details and Email address. It is purely OAuth2 Compatible login method and its secure.
Workflow is simple
- User Clicks on Login with Google Button on XYZ Website
- Google OAuth2 Popup opens and ask the user login to google account first.
- If Logged in, it shows the permissions that this website is requesting, then user accept this by pressing button Allow.
- Now the website receives the user information which are requested by the XYZ Website ( Login Scope )
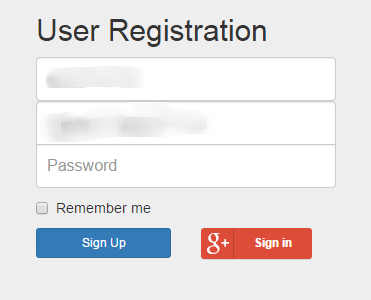
Before you begin this tutorial, you actually need to setup a Project through Google Developer Console. You can follow google docs here.
Step 1: Create Project


Now Client Key and Secret key successfully created.
Note: For javascript based login, we dont use Secret key, only Client Key is enough.
How to Google+ Javascript Login
  <script type="text/javascript">
  (function() {
    var po = document.createElement(script);
    po.type = text/javascript; po.async = true;
    po.src = https://plus.google.com/js/client:plusone.js;
    var s = document.getElementsByTagName(script)[0];
    s.parentNode.insertBefore(po, s);
  })();
  </script>
    <!-- Bootstrap core CSS -->
  <link href="http://getbootstrap.com/dist/css/bootstrap.min.css" rel="stylesheet">

    <!-- Custom styles for this template -->
  <link href="http://getbootstrap.com/examples/signin/signin.css" rel="stylesheet">

  <script src="https://ajax.googleapis.com/ajax/libs/jquery/1.11.1/jquery.min.js"></script>
  <script src="http://getbootstrap.com/dist/js/bootstrap.min.js"></script>
Complete HTML Body code for the Form and Google+ Button
   <div class="container">

      <form class="form-signin" role="form">
            <div id="status"></div>
        <h2 class="form-signin-heading">User Registration</h2>

        <label for="inputFname" class="sr-only">First Name</label>
            <input type="text" id="inputFullname" class="form-control" placeholder="First Name" required autofocus>

        <label for="inputEmail" class="sr-only">Email address</label>
        <input type="email" id="inputEmail" class="form-control" placeholder="Email address" required >

        <label for="inputPassword" class="sr-only">Password</label>
        <input type="password" id="inputPassword" class="form-control" placeholder="Password" required>

        <div class="row">
            <div class="col-md-6">
                <button class="btn btn-sm btn-primary btn-block" type="submit">Sign Up</button>
            </div>
            <div class="col-md-6">
                <button class="g-signin "
                    data-scope="https://www.googleapis.com/auth/plus.login https://www.googleapis.com/auth/userinfo.email"
                    data-requestvisibleactions="http://schemas.google.com/AddActivity"
                    data-clientId="1049178870057-usbfluijl3qtq3nijmucnsksr9gvkag4.apps.googleusercontent.com"
                    data-accesstype="offline"
                    data-callback="mycoddeSignIn"
                    data-theme="dark"
                    data-cookiepolicy="single_host_origin">
                </button>
            </div>
        </div>


      </form>

    </div> <!-- /container -->
Javascript Code for the Google+ API and Fetching User Details, Email from Google Profile
    <script type="text/javascript">
    var gpclass = (function(){

    //Defining Class Variables here
    var response = undefined;
    return {
        //Class functions / Objects

        mycoddeSignIn:function(response){
            // The user is signed in
            if (response[access_token]) {

                //Get User Info from Google Plus API
                gapi.client.load(plus,v1,this.getUserInformation);

            } else if (response[error]) {
                // There was an error, which means the user is not signed in.
                //alert(There was an error:  + authResult[error]);
            }
        },

        getUserInformation: function(){
            var request = gapi.client.plus.people.get( {userId : me} );
            request.execute( function(profile) {
                var email = profile[emails].filter(function(v) {
                    return v.type === account; // Filter out the primary email
                })[0].value;
                var fName = profile.displayName;
                $("#inputFullname").val(fName);
                $("#inputEmail").val(email);
            });
        }

    }; //End of Return
    })();

    function mycoddeSignIn(gpSignInResponse){
        gpclass.mycoddeSignIn(gpSignInResponse);
    }
    </script>
If you click on the Google+ Login Button it will show a popup like below. This means your configuration in google developer console is right.
 |
| Login using Google Popup |
PhoneGap Tutorial posting form data to MySql database Using PHP
Insert title here
Ajax Form
$username="u462945266_sree";
$password="9963447141";
$database="u462945266_db";
$url = "mysql.neq3.com";

$category = $_POST[Category];
$website = $_POST[Website];
$title  = $_POST[CouponTitle];
$description = $_POST[CouponDescription];
$code = $_POST[CouponCode];
$affiliatelink = $_POST[AffiliateLink];
$affiliateimage = $_POST[AffiliateImage];


mysql_connect($url,$username,$password);

@mysql_select_db($database) or die( "Unable to select database");

$query = "INSERT INTO Coupons(Category,Website,CouponTitle,CouponDescription,CouponCode,AffiliateLink,AffiliateImage) VALUES ($category,$website,$title,$description,$code, $affiliatelink, $affiliateimage)";

mysql_query($query);

mysql_close();
echo "You successfully added your Coupon";
?>
 All Form data will be stored in mysql database like this
  In my next tutorial i am going to explain how to convert this table data xml service or xml sothat it can be used as webservice.